How to install CUDA on Ubuntu 19.10, to make use of an NVIDIA Tesla C2075 card
I have bought an Nvidia Tesla C2075 card, in order to try some deep learning and other data science stuff. Even though Nvidia tries very hard to make its products the most reliable on the market (and without any doubt they are), it have been with some issues to have Nvidia CUDA installed properly these days, on the latest Ubuntu. Of course, it is so mostly because the Tesla C2075 card is a fairly old one.
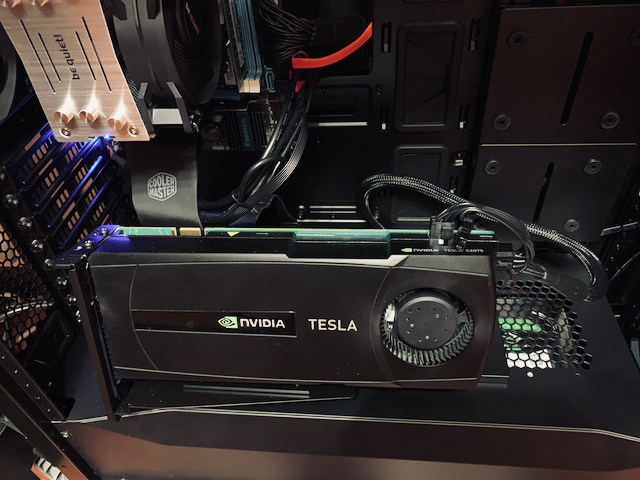
Meet the card :)

Installation
-
Get the latest Ubuntu installed via https://ubuntu.com/download
-
Afterwards, it would be helpful for one to navigate through directories in a terminal, if you had Midnight Commander installed. You can do it by the following command:
sudo apt-get install mcNow it is time to find out a compute capability of the card.
-
As per the section CUDA-Enabled Tesla Products of the https://developer.nvidia.com/cuda-gpus, a compute capability can be found, and it equals to 2.0 for the Tesla C2075 card.
-
Given the 2.0 compute capability, it can be found from the https://github.com/NVIDIA/nvidia-docker/wiki/CUDA (also the https://en.wikipedia.org/wiki/Nvidia_Tesla) that the most CUDA version can be as high as 8.0, because next successive versions of CUDA use different GPU architectures (Kepler and so on).
-
Check NVIDIA drivers have been installed:
-
Open Software Updater

-
Click on “Settings..”
-
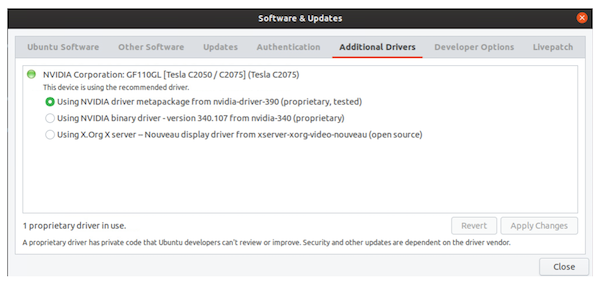
Clicking on “Additional Drivers” tab you should see something like this:

It says that the card has been found and NVIDIA drivers are properly installed.
-
Go to https://developer.nvidia.com/cuda-toolkit-archive
-
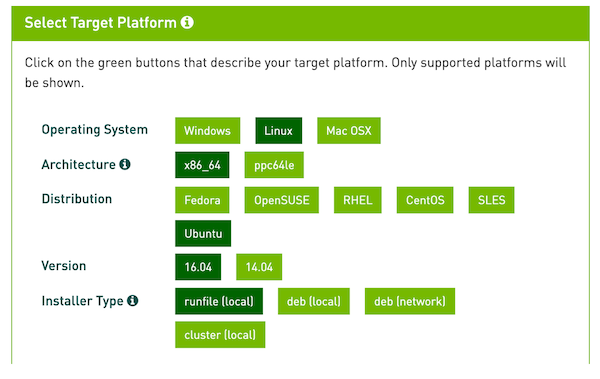
Given that the card driver needs the 8.0 version of CUDA Toolkit, click on “CUDA Toolkit 8.0 GA2”, choose Linux, then x86_64, then Ubuntu, then 16.04 (don’t mind it for now), and choose run file (local).

-
Download the “Base Installer” and “Patch 2 (Released Jun 26, 2017)”
-
Install CUDA dependencies:
sudo apt-get install freeglut3 freeglut3-dev libxi-dev libxmu-dev
- Run these commands:
sh cuda_8.0.61_375.26_linux.run --tar mxvf

sudo cp ./InstallUtils.pm /usr/lib/x86_64-linux-gnu/perl-base

rm -rf ./run_files ./uninstall_cuda.pl ./cuda-installer.pl ./InstallUtils.pm- Run “Base installer” using the following command (the flag ‘—override’ makes the CUDA installer bypass a compiler version check):
sudo sh cuda_8.0.61_375.26_linux.run --override- You will be prompted for accepting or declining license:
Do you accept the previously read EULA?
accept/decline/quit: accept- As well as you will be warned about an unsupported configuration:
You are attempting to install on an unsupported configuration. Do you wish to continue?
(y)es/(n)o [ default is no ]: yes- Then, you will have to decline the following offer (because you already have drivers installed, and not to say they are more recent):
Install NVIDIA Accelerated Graphics Driver for Linux-x86_64 375.26?
(y)es/(n)o/(q)uit: no- And the last answers:
Install the CUDA 8.0 Toolkit?
(y)es/(n)o/(q)uit: yes

Enter Toolkit Location
[ default is /usr/local/cuda-8.0 ]:

Do you want to install a symbolic link at /usr/local/cuda?
(y)es/(n)o/(q)uit: yes

Install the CUDA 8.0 Samples?
(y)es/(n)o/(q)uit: yes

Enter CUDA Samples Location
[ default is /home/tesla ]:-
After some time installation should be done.
-
Run the “Patch 2 (Released Jun 26, 2017)”:
sudo sh cuda_8.0.61.2_linux.run- In order to install gcc version 5, do the following:
Add at the end of the /etc/apt/sources.list the string:

deb http://cz.archive.ubuntu.com/ubuntu cosmic main universe

Update the packages list via:

sudo apt-get update- Install gcc and g++ version 5:
sudo apt-get install gcc-5 g++-5-
Remove the last line from /etc/apt/sources.list and run updating packages again.
-
Make symbolic links to the compilers installed:
sudo ln -s /usr/bin/gcc-5 /usr/local/cuda/bin/gcc
sudo ln -s /usr/bin/g++-5 /usr/local/cuda/bin/g++-
Run the ‘make’ make command inside the CUDA samples directory.
-
After the samples have got built, you may run (in the current directory) the following command, to get information about a NVIDIA Tesla card:
./bin/x86_64/linux/release/deviceQuery

./bin/x86_64/linux/release/deviceQuery Starting...

 CUDA Device Query (Runtime API) version (CUDART static linking)

Detected 1 CUDA Capable device(s)

Device 0: "Tesla C2075"
  CUDA Driver Version / Runtime Version          9.1 / 8.0
  CUDA Capability Major/Minor version number:    2.0
  Total amount of global memory:                 5302 MBytes (5559156736 bytes)
  (14) Multiprocessors, ( 32) CUDA Cores/MP:     448 CUDA Cores
  GPU Max Clock rate:                            1147 MHz (1.15 GHz)
  Memory Clock rate:                             1566 Mhz
  Memory Bus Width:                              384-bit
  L2 Cache Size:                                 786432 bytes
  Maximum Texture Dimension Size (x,y,z)         1D=(65536), 2D=(65536, 65535), 3D=(2048, 2048, 2048)
  Maximum Layered 1D Texture Size, (num) layers  1D=(16384), 2048 layers
  Maximum Layered 2D Texture Size, (num) layers  2D=(16384, 16384), 2048 layers
  Total amount of constant memory:               65536 bytes
  Total amount of shared memory per block:       49152 bytes
  Total number of registers available per block: 32768
  Warp size:                                     32
  Maximum number of threads per multiprocessor:  1536
  Maximum number of threads per block:           1024
  Max dimension size of a thread block (x,y,z): (1024, 1024, 64)
  Max dimension size of a grid size    (x,y,z): (65535, 65535, 65535)
  Maximum memory pitch:                          2147483647 bytes
  Texture alignment:                             512 bytes
  Concurrent copy and kernel execution:          Yes with 2 copy engine(s)
  Run time limit on kernels:                     Yes
  Integrated GPU sharing Host Memory:            No
  Support host page-locked memory mapping:       Yes
  Alignment requirement for Surfaces:            Yes
  Device has ECC support:                        Enabled
  Device supports Unified Addressing (UVA):      Yes
  Device PCI Domain ID / Bus ID / location ID:   0 / 1 / 0
  Compute Mode:
     < Default (multiple host threads can use ::cudaSetDevice() with device simultaneously) >

deviceQuery, CUDA Driver = CUDART, CUDA Driver Version = 9.1, CUDA Runtime Version = 8.0, NumDevs = 1, Device0 = Tesla C2075
Result = PASS